
We set up analytics on landings and Bitrix24. Websites - step by step guide
This article was translated automatically. We are working over improving the translation.
Please send your questions about the article to info@intervolga.ru
Why is an landing page to analyst?
We notice the general trend of simplifying content and delivering marketing messages to consumers. Landing page designers (landing pages) are a prime example. Tilda, LPGenerator, PlatformaLP - tools that do not require serious skills in web development. If you do not require a wow design, the site can be made in a few hours. This will be a full-fledged web page. There will be forms on it, you can sell something with it.
Bitrix released its designer landing pages in October 2017. In the first six months, users created hundreds of thousands of pages. At the presentation in October 2018, ~ 100 thousand pages of shared access were announced.
The next stage is an army of marketers, promoting the sites of Bitrix24 in various channels from all sites. This stage is in full swing. The volume of traffic will only grow.
The next wave - the heroes-analysts who rake up the traffic debris, sift valuable ore, indicate the direction of development.
What stage are you now? When will you go to the next?
What and how to analyze on the landing. Typical cases:
-
Business goals:
-
Filling out forms: where the visitor came from, who filled out the form.
-
Call Tracking: sources of calls, call price, associated conversions to a call.
-
Secondary goals:
-
Interesting content: Clickable sections of the landing page, banners, links, downloaded files.
-
The behavior of visitors to the site: Where they click on what they read, the time the user is on the page. At what stage do they leave “Landing Funnel”?
Examples of typical reports for landings
Calls by source. If Calltracking is connected, you will see the data about the sources of calls.
Call cost for AdWords, for example. We link AdWords and call tracking with Analytics, we see the price of a call in Analytics.
Completed forms. In terms of sources, utm-marks and any other:
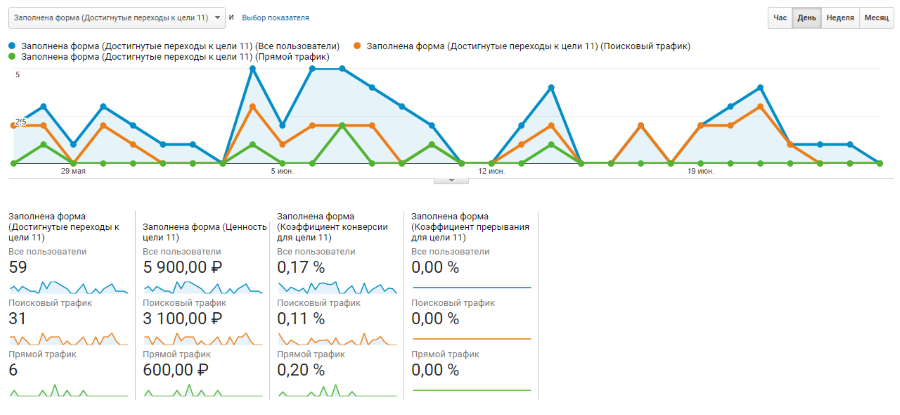
Report on user behavior on the site.
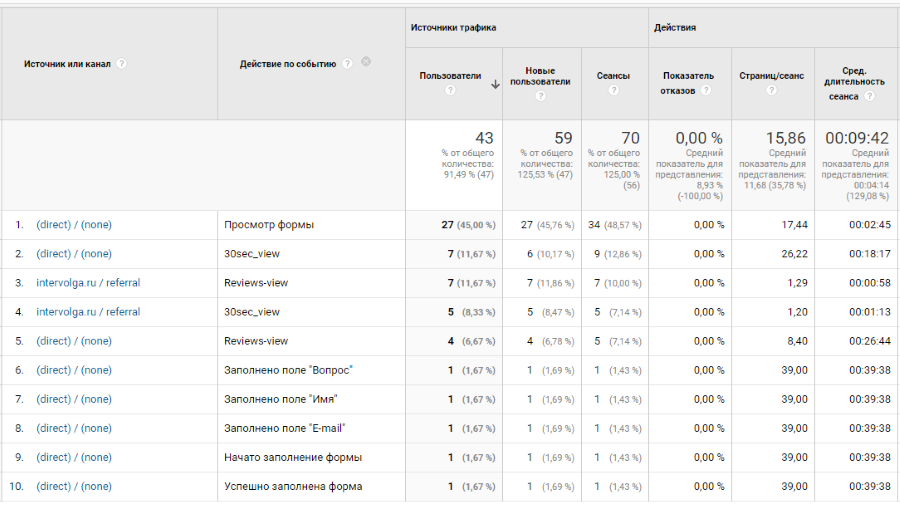
For site owners to study such reports - a mandatory practice. Are you wondering where the advertising budget goes? How many conversions does each channel bring?
An article for those who made a website on the designer wants to set up data transfer to Analytics. He wants to receive data and draw conclusions.
It will be useful for the overall development of Internet marketers of all specializations.
Tools
In the article we set up analytics for the site Bitrix24. Tips work for popular site designers and “individually designed landings” (they are very rare).
All settings are done via Google Tag Manager. A programmer is needed exactly once - to install GTM on the site. For Bitrix24 sites, a programmer is not needed at all, integration with GTM is built into the platform.
Will need:
-
GTM account with editing rights;
-
Analytics account with editing rights
-
access to CRM Bitrix24 with administrator rights to configure CRM forms.
GTM installation for landing, basic configuration, placement of meters
Modern designers have a special field for specifying the number of the counter. The designer takes care of the counter output on the page.
Create a resource in GTM, specify its identifier. After that, the GTM container will appear on the site while it is still empty. All subsequent actions are performed in GTM.

Connecting Analytics
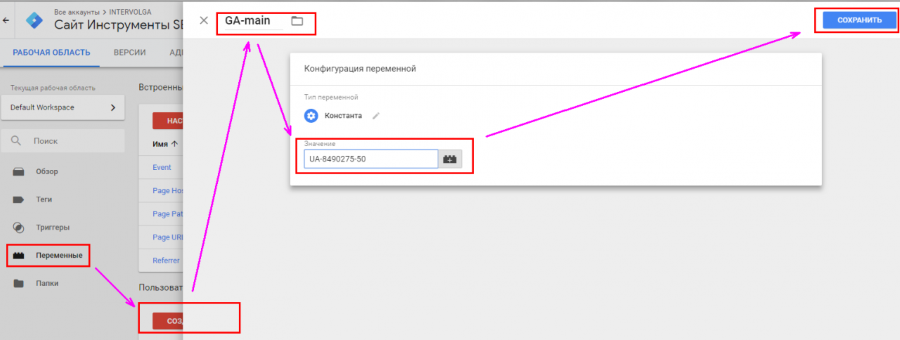
1. Create a variable of type "Constant". The magic variable is needed for any tags of the type “Universal Analytics”. Come up with a convenient name for the variable.
In value we save the tracking identifier Analytics.
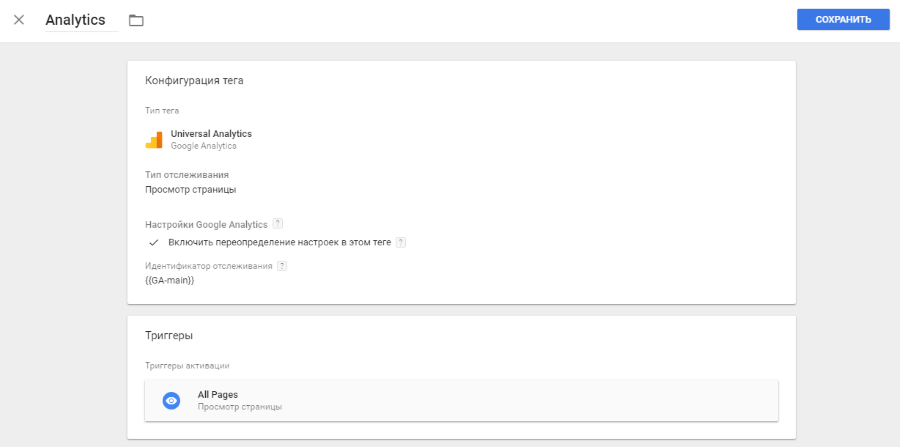
2. Add a tag like "Universal Analytics".
-
Tracking Type - View Page.
-
Enable override settings.
-
Tracking ID - Use the created variable.
-
Trigger "All Pages".
This set of instructions applies to all subsequent tags of type Universal Analytics (except for the choice of a trigger, we will write about this explicitly). We will not repeat.
Tag validation
There is a special “View Mode” in GTM, which allows you to understand whether tags work correctly and what data is written in GTM. In fact, this is a built-in debugger))
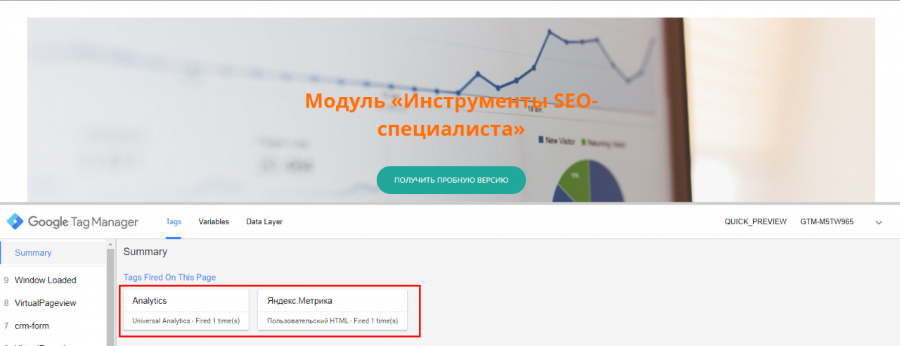
Turns on the PREVIEW button.

Refresh your browser page. A panel will appear with additional information. In our example, the Analytic tag is on the page. Preparation is over. You can start customization.
CRM forms
CRM forms are a powerful tool with great potential for receiving data from users and transferring them to CRM and analytics systems. If on your site there is no such form yet, it is time to get.
The process of setting up a landing page consists of several steps.
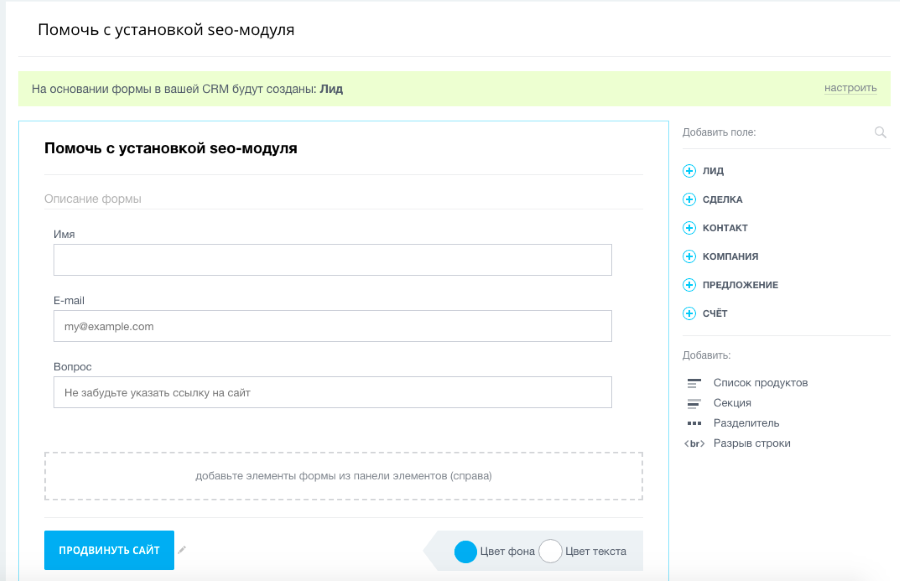
1. Customize the form in CRM
To set up a form, you need to be a CRM Bitrix24 administrator in your portal or have rights to edit CRM forms. You can customize the fields, groups of fields, captions, buttons, base and optional color. Visual editor and intuitive interface. Comfortable and modern.
Do not overdo it with the number of fields. There is a rule - each next field reduces the form conversion by 10%. Leave the most necessary. The rest ask during the processing of the application.
2. Setting up the integration of Bitrix24 and Analytics
We are a little tricky in the title. Of course, the CRM form does not need to be integrated with Bitrix24, it is initially part of CRM. It is important to verify the correctness of the data transfer. Try to send the form, see what comes - lead or deal. How to notify who is responsible. If the deal fails due to the fact that the seller did not receive a notice in CRM on time, it will be insulting; (
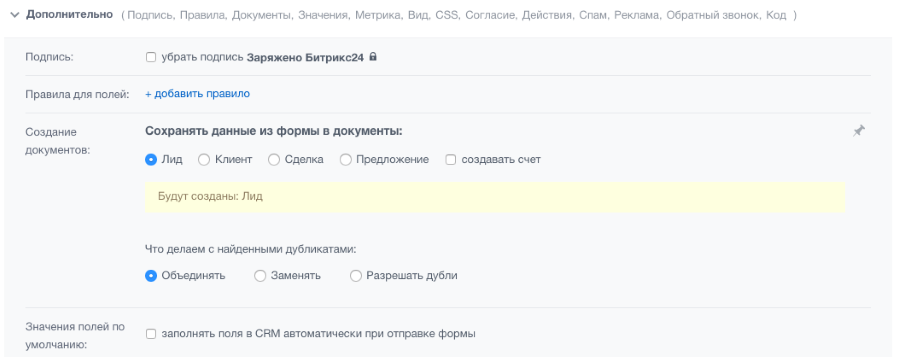
Each crm-form has a public page with the address of the form
https://cpiv.bitrix24.ru/pub/form/14_pomoch_s_ustanovkoy_seo_modulya/h4f85n/ . On it, you can check the appearance and data transfer in CRM before placing on the landing page.
Form integration with Analytics thoughtfully. Especially for one-page sites, where there is so little data for analysis.
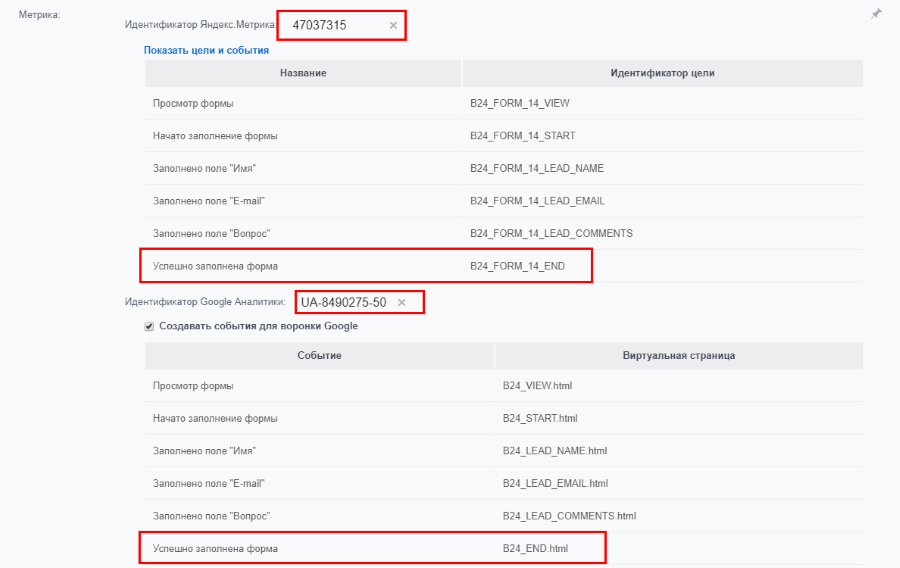
In the settings of the form, specify the counter number and the Analytics ID. Check the box “Create events for Google Funnel”.
For Analytics, the form itself will start sending events. True, we noticed one oddity - in the form there is the event "View form" by default. Called with every hit on the page. It doesn't matter if the user sees the form or not. It is clear that the frequency of this event is off scale. And, honestly, a lot of good does not bring. This bug or feature is unknown.
3. We check the correctness of data transmission
-
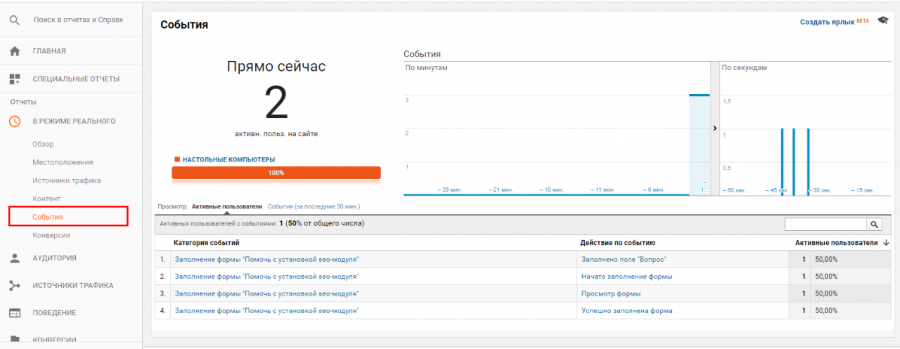
In Analytics - use the report "Real-time" - "Events". Click on the form, send it. See how events flock to Analytics. Pure magic.
-
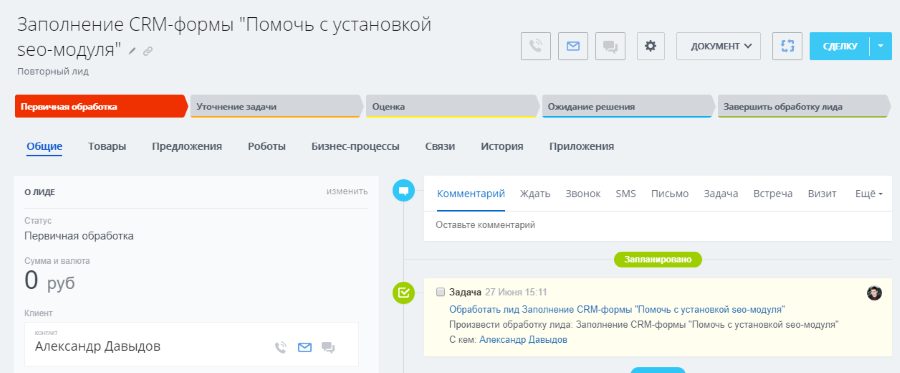
In CRM - the lead on the desired responsible, notification in the portal and the mail responsible. There will be no leads, there will be nothing to analyze!
Call Tracking
The result of connecting call tracking in Analytics is correct data on calls from the site. A call tracking connection consists of the following steps:
-
Via the tag “Custom HTML” we place the call tracking code on the site.
-
We customize the project inside the call tracking service. Did not include in the article.
-
We customize the integration of call tracking and analytics.
Timer
There is a known problem when setting up Analytics for one-page sites - a high failure rate. Google Analytics considers a visit with exactly one page as a failure if the user didn’t perform any понят understandable ’actions for Analytics (the page does not transmit any events and does not query the Analytics server).
For most landings, you will see some statistics on failures.
:
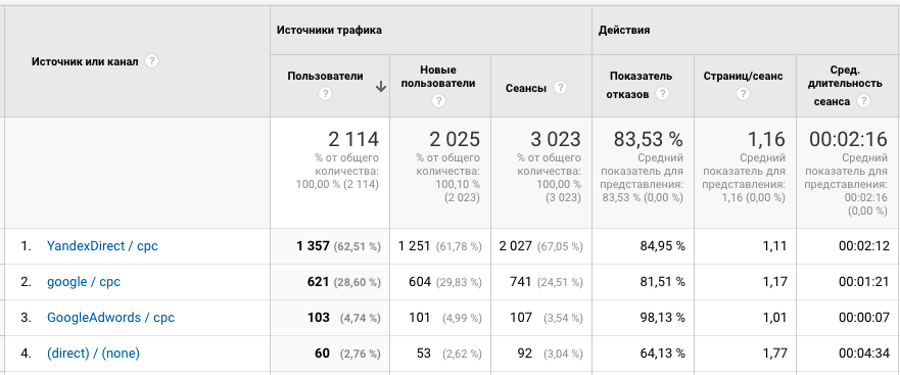
Does this mean that advertising works poorly? Not. This means that you need to configure additional event transmission.
We propose to do a simple thing - connect a timer. We will consider the visit "not a failure" if the user spent on the site, say, 30 seconds. During this time, you can fully explore the page. If your landing page is too long or detailed, enter any necessary number. After 30 seconds we will send to Analytics the information that the timer has worked. From this point on, the visit is not considered a refusal.
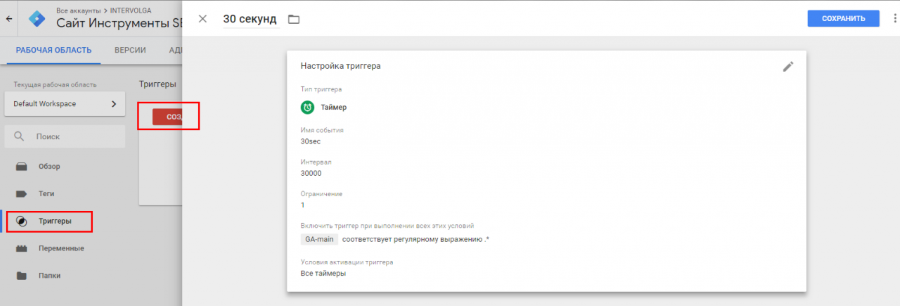
Add a trigger to the GTM type Timer. Specify the interval in milliseconds (30000), the restriction on a one-time start. For the trigger to work on any page, you must specify that:
“Magic variable for analytics” matches regular expression.*
-
Create a Universal Analytics tag.
-
Tracking type - Event. Specify any category, we chose Interactions. Action - 30sec_view. The name of the event can be any. The main thing is that you understand what is happening.
-
We publish the tag.
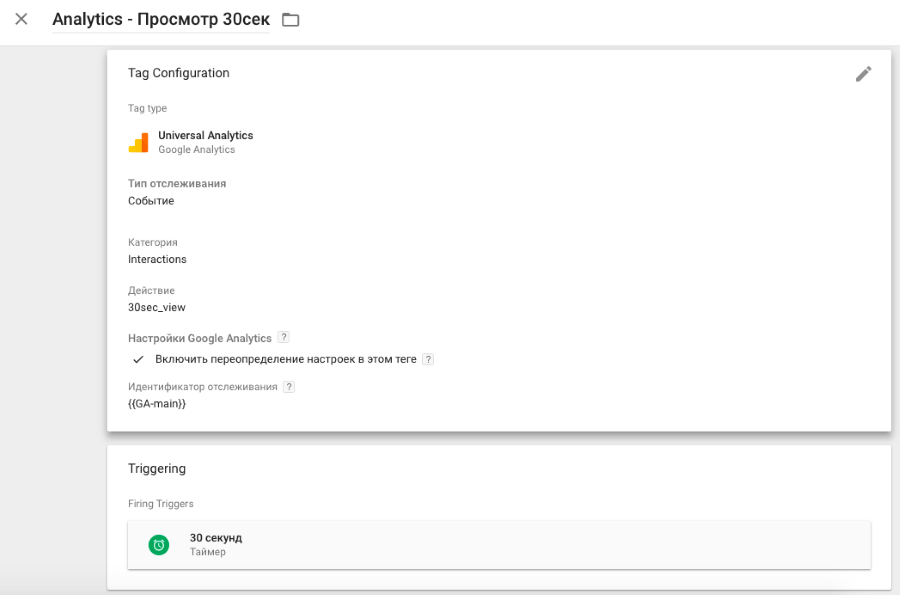
Verification
We carry out check in 2 calls. First we check that the timer is working, and the tags start on the page. Open the view mode. We are waiting for 30 seconds)
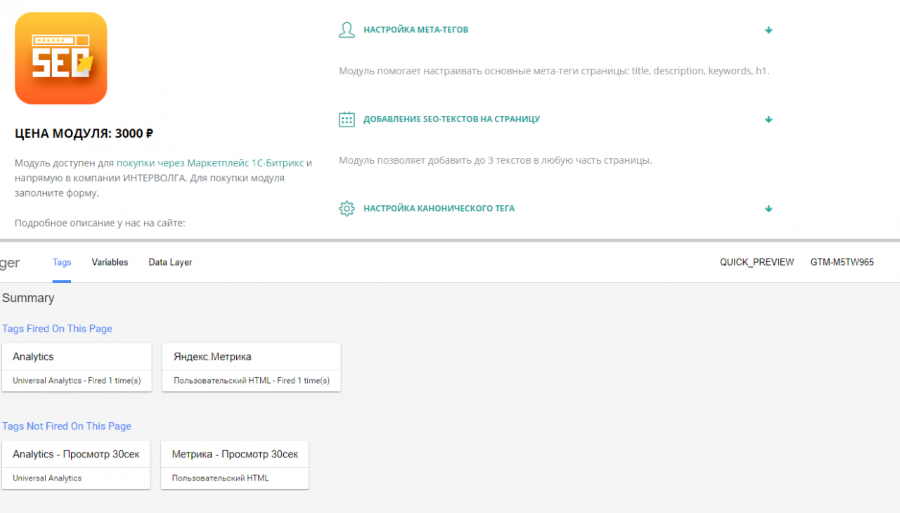

It is seen that the tags were launched on the page. Checking the transfer of events is similar to the CRM form. View live and conversion reports. The data will be. The bounce rate will begin to decline.
In the future, you can create segments of users who have studied the landing for a long time, and show them "catching up" advertising.
Scrolled to reviews (any other section of the page)
Sometimes it is useful to know whether a user has seen a specific block of a page or not. Especially for long pages - if only 10% of visitors reach an important block in your opinion, you should probably raise it higher.
In our example, add the event "View block reviews." We will send it to the analytics system every time the user sees the corresponding block.
Since October 2017 GTM has Element Visibility trigger. We will use it.
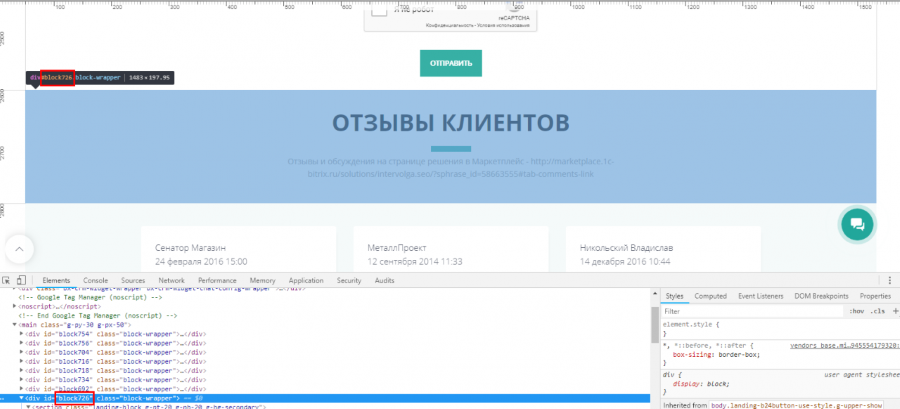
First you need to decide how the trigger will understand that the desired block on the screen. You can bind the trigger to the block id (ideal if there is one) or to the CSS selector (you can specify several of them).
In our case, the block has an id. It is easy to find in the page code — #block726.
-
Copy the id value (without the lattice).
-
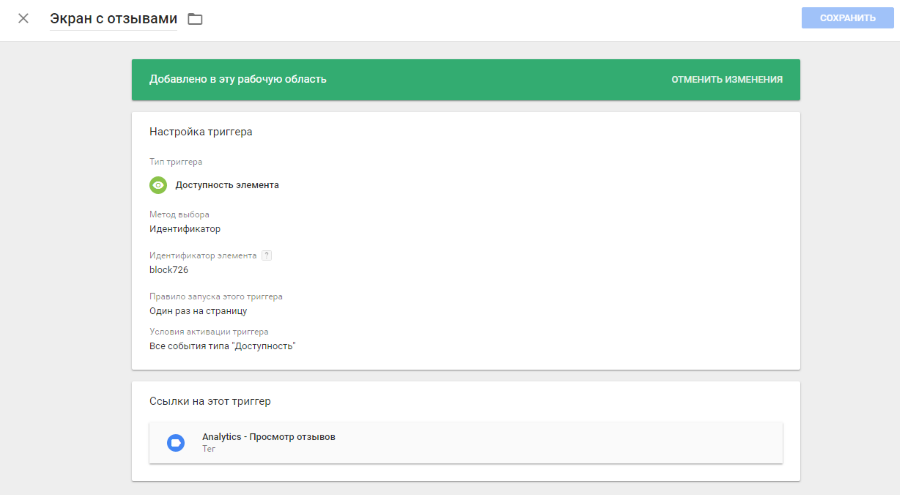
Create an item accessibility trigger.
-
Selection method - Identifier. Enter our id.
-
Startup rules - once per page.
-
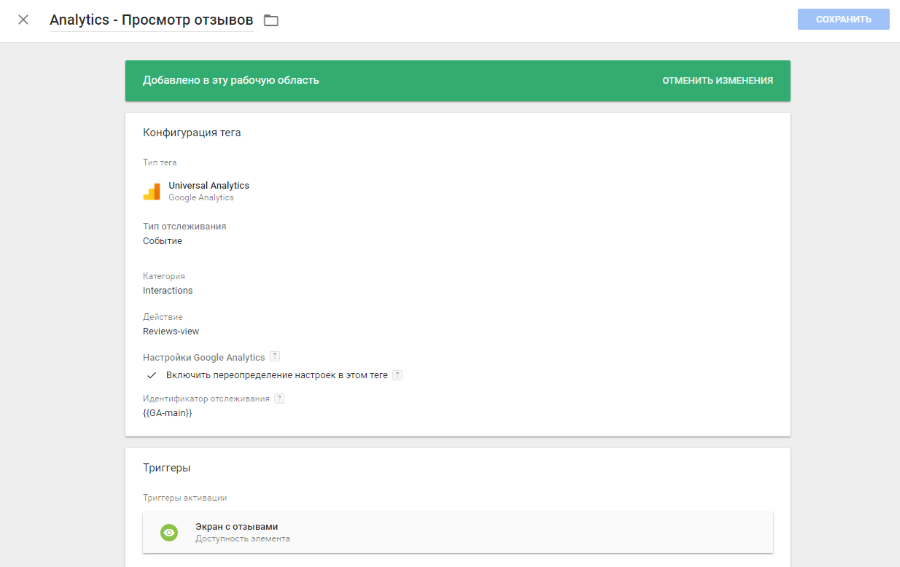
Create a Universal Analytics tag.
-
Tracking type - Event. You can specify the same Interactions category that you specified for the timer. Action - Reviews_vew.
-
We publish the tag.
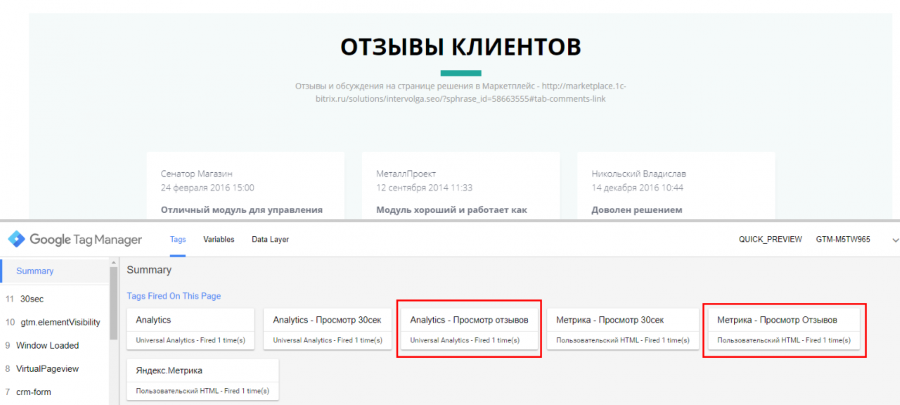
Tag validation
Perform similarly. First, in the "view mode" we open the page, scroll to the reviews. It can be seen that the tag worked.
Now in Analytics we catch events.
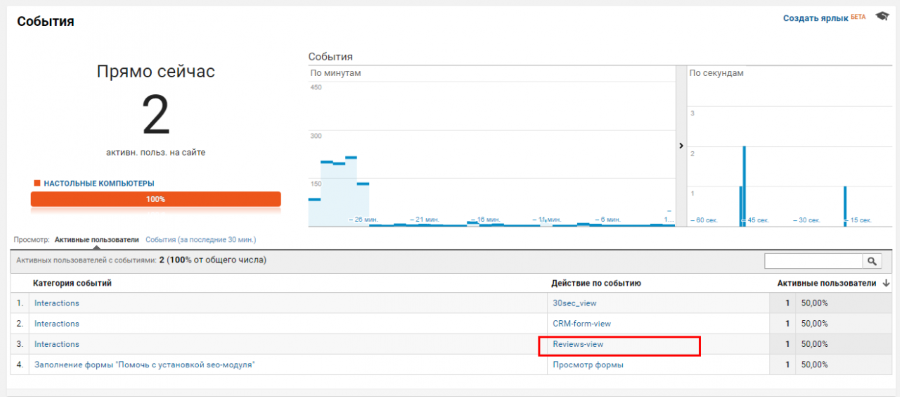
The Reviews_view event enters Analytics in real time when we see a block of reviews on the screen.
Goals in Analytics
Analytics has a total of 20 goals. They are divided into 4 sets. Help recommends using interesting actions as targets. Conversion, in one word.
In our case, the conversion on the site - filling out the form. Set up a goal. Since we included the checkbox “Create events for the Google funnel” in the CRM form, each form filling transmits to Analytics not only an event, but also information about the user reaching a particular “virtual” page. In our case, this is /B24_END.html. We will specify it as a criterion for achieving the goal.
-
In the administrator mode in Analytics, open the View - Goals. Press the "+ Target" button.
-
Setting a goal - you can choose a template or your own.
-
Description of the goal - enter the name. Type - Landing Page.
-
Target details:
-
Transition - Equal - gently copy the virtual page path for the successfully completed form from the CRM-form settings.
-
Indicate the value of the goal (optional).
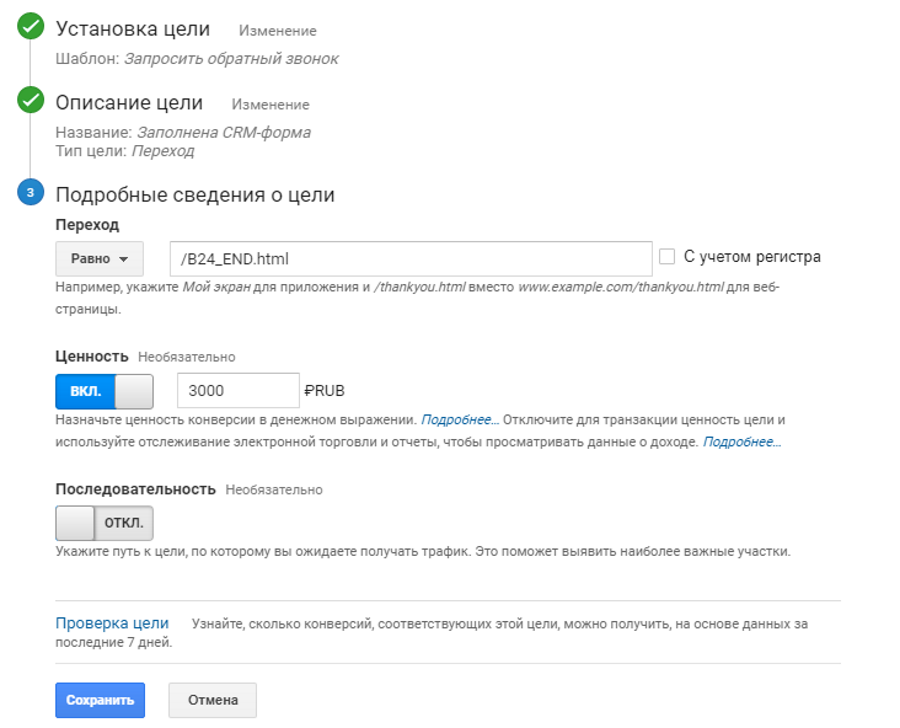
Result
-
We set up a CRM form, placed on the landing page.
-
Taught a form to transfer data to Analytics.
-
We chose some interesting user actions. Learned how to create triggers, timers and triggers visibility element.
-
Analytics receives information about user actions on the site.
Analysts, your way out!
The complexity of the actions described - a few hours. Do not cope - contact us.
This article was translated automatically. We are working over improving the translation.
Please send your questions about the article to info@intervolga.ru
- 06.06.2019
-
Aleksandr Davydov
