
Bitrix24 Visual editor customization
Bitrix24 is a universal portal with an abundance of tools for solving business problems.
There are Bitrix functions that work very well and are actively used by users - for example, creating calendar events, adding users, and a visual editor.
However, in some cases, the capabilities of the standard tools are not enough to solve everyday tasks. In other cases, they simply waste too much time.
What’s great is that you can modify the standard functions of Bitrix24 if you have an on-premise version. (This solution also applies to 1C-Bitrix: Site Management).
We have implemented and customized Bitrix24 for more than 100 companies in Construction, Engineering, Pharma, Sales departments, HR, and more.
This article is an example of refinement to a standard Bitrix24 feature.
We added our own button to the visual editor.
When creating blog posts, news and adding comments, Bitrix24 users use the visual editor every day. The editor features allow you to add and format text, add images, tables, videos, etc.
Standard visual editor:

The Standard visual editor is used in the administrative and public parts of Bitrix24, in editing mode, for writing posts and commenting on them.
Sometimes, this standard functionality is not enough or it is inconvenient - the solution may be to add your own button to the visual editor. Improvement of the visual editor is possible in the boxed version of Bitrix24.
Situation:
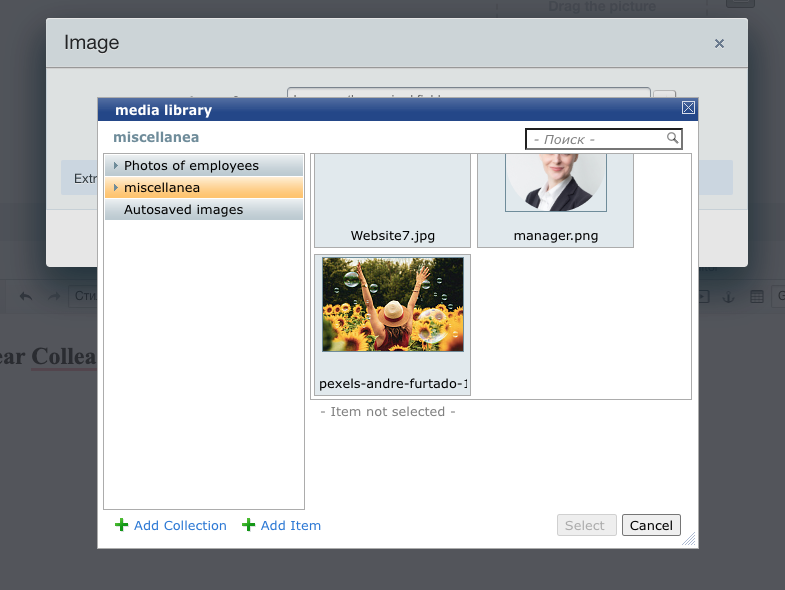
A content manager publishes news or an article on the company website via the backend of the portal. One article may contain several images, sometimes dozens.
In the standard visual editor, images can be added to text only one at a time, the manager will have to repeat the selection procedure for each image.

Problem:
The content manager spends a lot of time creating a single article and is dissatisfied with the labor-intensivity of such routine tasks. His Productivity drops, and less useful content is published.
Solution:
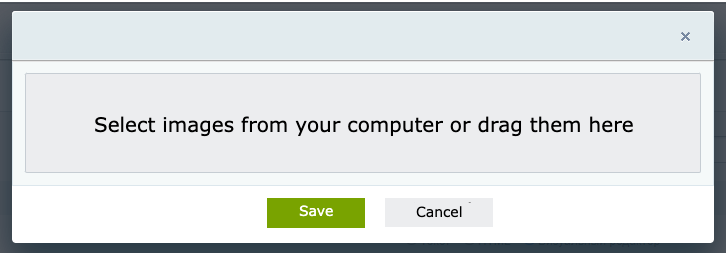
Add a button that would allow uploading multiple images at a time in posts.

The content manager selects all the images at once, and supplements the article with text - the post is published a lot faster, and the employee is satisfied with the convenience of the tool.
What can be customized in the Bitrix24 visual editor?
Almost any functionality can be implemented in Bitrix24 Visual editor using a button as we have done.
The functionality of the button can be designed according to the needs of the client. For example, you can embed a voice input button. You’ll only need to dictate the post, and Bitrix24 processes the words into text.
An important feature of our solution is that the button will be added to all visual editors.
Below, we give the technical details of the implementation. This part of the article may be of interest to Bitrix24 developers.
Creating a Button
Let's say we want to add our own button, which will add the phrase "Hello, World!"
First, we need to register the event handler main:OnEpilog (Our aim is to add this button to all visual editors, right?). This is where PHP ends - everything else will be implement in JavaScript.
A custom button is, in fact, a custom class. But, since we need to inherit properties from the Bitrix button, we will describe this class within the OnEditorBaseControlsDefined event.
We need to specify a name and ID for our button. All other arguments are optional.
Pay attention to BX.extend - this is the line that will make the visual editor "accept" our button.
We have created a button, now we need to display it in the Bitrix visual editor. To do this, we need to subscribe to two more events of the visual editor - “GetTopButtons” and “GetControlsMap”.
And, of course, we also need to style the button.
For this example, we simply take one of the Bitrix icons.
At the point, our button will be displayed on the editor, but nothing will happen when it is clicked - it's time to teach it this.
In the description of the button, add the “OnClick” method, which will call the dialog for this button.
Creating a Dialog
A Dialog is a window that will be shown to the user when they click on our button.
Like a button, a dialog is a separate class that must be created on the same event - it is acceptable to place it next to the declaration of the button class.
We also need to link the previously created button and this dialog.
To display the dialog and manage its content, we need to describe the following method:
In this case, the specified text will be displayed in the body of the dialog, but in this place it is even possible to load your own component via AJAX.

All that remains for us is to describe the actions that should take place when you click on the "Save" button.
For example :
The text “Hello, World!” should appear in bold, in the editor.
It would seem that’s all, but no.
Due to an error in Bitrix core, we are unable to forward this information to the system.
We can tell Bitrix what to do at the moment a user clicks on the "Save" button.
Let's use the corresponding event.
The whole code fits perfectly into one event handler.
But, of course, no one prevents you from decomposing it into classes, highlighting JS extensions, and doing it beautifully.
Why we are the most qualified Bitrix24 partners for your customization project
INTERVOLGA possesses all Bitrix competencies required for Bitrix24 customization.
We are web integrators with vast experience in a plethora of tasks, for companies of all sizes in different industries.
A few examples:
We offer high-quality code and fast development.
Not sure if your requirement can be implemented in Bitrix24?
You can also leave a request in the form below.
- 26.01.2022
-
Ivan Abashin
-
Daria Kugatova

