

How to install and setup Google Analytics on your web site

Imagine that you have a business. And you promote it online via a website and digital marketing.
At some point, you may begin to wonder how many people see your website. What do they do on the pages? How long do clients spend reading articles?.
You might also want to know How much business you get via the website?
There is a service that helps answer such questions. Google Analytics is the most famous and worldwide tool for site analysis.
Below you will find a short instruction manual on how to create an account and connect it to your webpage in Bitrix24.
What you will need:
-
a Bitrix24 account
-
a google account
-
about 30 minutes of time
1. Start by creating a bitrix24 website with at least one webpage on it. We examined how to do this in one of our previous articles.
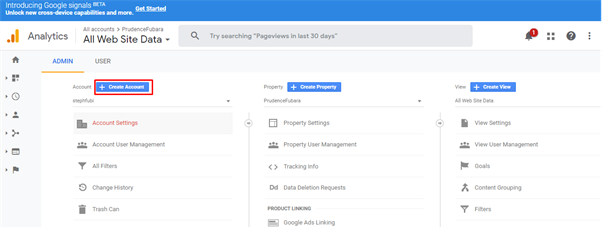
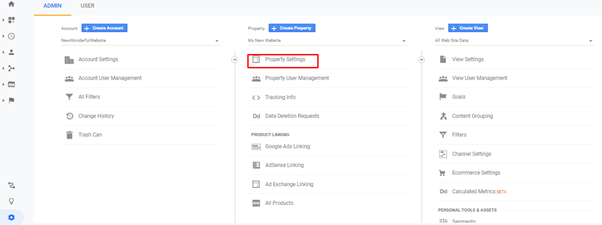
2. Next, you need to create a Google Analytics account. Please go to go to the special page https://analytics.google.com/ and click on “Create Account”. If you already have an analytics account, go to Administrator -> Create Account.
3. Setup an account name and other main preferences. Be careful though, as some of the settings can not be changed in the future.
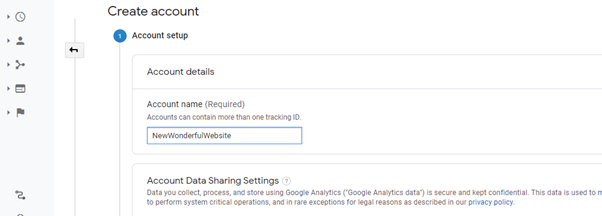
You may leave all flags in section Data access settings as they are by default. You will be able to change them later.
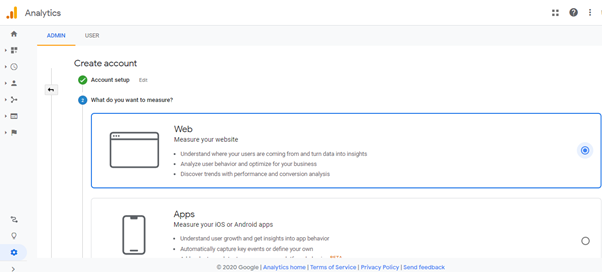
Next, choose a Web in a form with the choice that you currently need to analyze. Our bitrix24 site is a “clear” web-page. We don’t need to choose anything else.
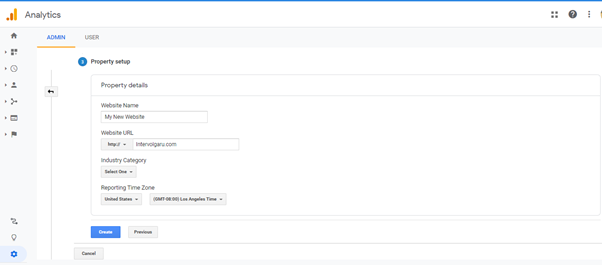
Then, choose a name for the website (earlier, we set the name of the account, don’t confuse them as they are totally different), its address, area of activity and timezone. You cannot change the Time zone in the future. Please be careful.
4. After you click the Create button, the new Analytics account and Resource will be created and you will see its unique ID(tracking id).

5. Copy and paste the Analytics tracking ID to your website settings. But first, find your tracking ID in the “Resource settings” section.
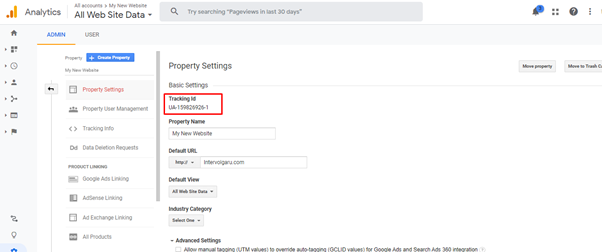
Go to Bitrix24 website settings and paste the tracking id into the Analytics section.

We recommend also to turn on a flag about buttons & links clicks. It helps you to analyze what your users do when they visit your web pages.

Don’t forget to save changes.
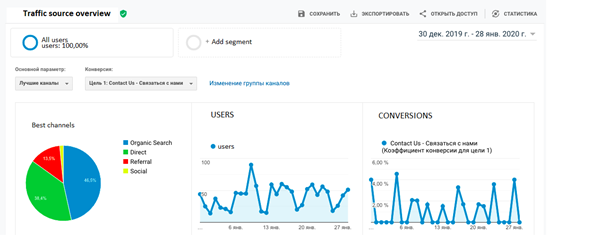
Congratulations! Now you can see a count of visitors to your website and interesting reports.
Want to find out “How to create correct reports?” We will show in one of our next articles.
Stay tuned!
- 03.03.2020
-
Aleksandr Davydov