


The Ultimate Guide to Bitrix24 implementation
Bitrix24 is undoubtedly one of the most powerful CRM systems on the market - It has vast capabilities, is highly customizable and flexible. And what’s more, Bitrix24 even offers a free cloud version for Unlimited users! This is a deal no other CRM offers.
However, one of the most common issues users complain about is its usability. The most popularly listed downsides on Bitrix24 include
- Complex navigation and interface
- Lack of support
- No training for staff
- Lack of reports for employee performance
- Too many functions which cannot be switched off
This guide is developed in 7 hierarchical modules which should be implemented accordingly. Each module helps to set up a Section/module of the CRM.
The average implementation period for each module is 1-2 weeks.
In this module, we go through the first steps
-
Registering a cloud portal of Bitrix24
-
Inviting employees
-
Creating the organizational structure i.e departments.
1. Registering a cloud portal
Step 1: Go to https://auth2.bitrix24.net/create/
There are currently 2 methods for creating an account
-
connecting Social media accounts (Facebook, Twitter, zoom, etc)
-
Register with an email.

We suggest using the 2nd method - Registering your company Bitrix24 with the Company’s email, as this will be the “Owner” and “Super admin” of the Bitrix24 portal.
The rights of this Owner cannot be transferred to another person.
Step 2: Choose your main purpose of using Bitrix24
As this guide is meant for SMBs, we will select CRM (Sell more).
Our recommendation is to choose here what you will use your Bitrix24 for, as it will

help the program choose Features that are most relevant to you.
After selection, Your Bitrix24 account is
Step 3: Change the name of your portal to your Brand name
After creation, you will be assigned a random address.
b24-8a77f2.bitrix24.ru

Changing this to your Company name makes the portal feel more like home to your employees and colleagues.
Step 4: General Settings
Click on “More” on the left Menu panel to show options, then scroll down, and click on “settings”
Here, you can set date/time formats, work hours, as well as more important settings like
-
Granting all users permissions to invite employees
-
Making Two-factor authentication compulsory for all users
We also advise you to configure the menu
1. remove items you don’t need, so you have a less cluttered interface.
2. Drag hidden items that you need up above the hidden line

If there are items you need in the “Hidden” section, simply drag them above the hidden line, and they will be added to the visible menu items.
2. Inviting Employees to Bitrix24 portal

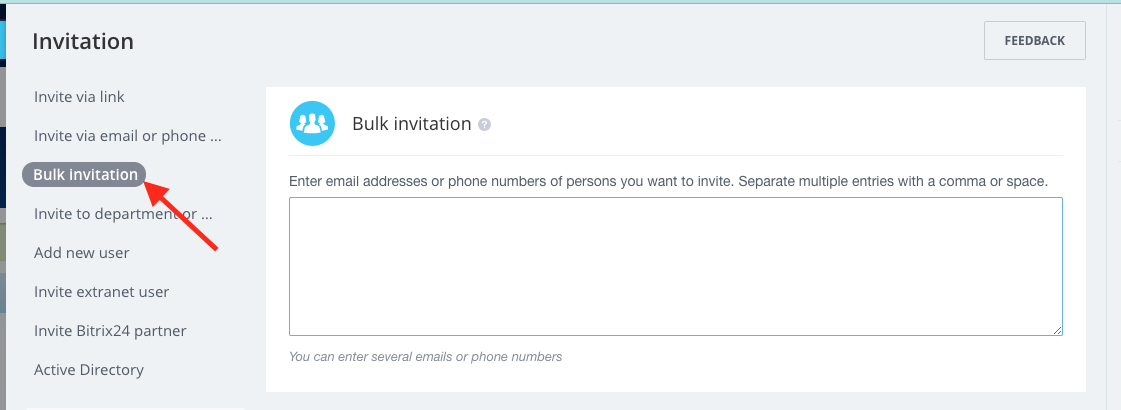
Click on “Invite” -> “+invite". A side panel opens
Bulk invitation is the fastest invitation method.
Simply type in as many emails as you like, and separate them with commas.
Your colleagues will get invitation emails, all they need to do is follow the prompts to create login and passcodes for themselves
To use other invitation methods, please follow the link below
- https://helpdesk.bitrix24.com/open/12363538/
3. Creating departments in Bitrix24
The next step is to create departments, assign department heads, and members of those departments.
Step 1: add departments and sub-departments

1. Go to the Top right corner -> Structure
2. Click on the “+” to add departments.
3. To add sub-departments, hover on the created department, the “+” will appear.

Step 2: Assign department head and members
-
Supervisor - Drag and drop employee in the “top” part of the department box
-
Department member - Drag and drop employee in the “bottom” part of the department box

Repeat this procedure for all employees.
In a situation where there are too many employees, click on the pen icon in the department->select from structure -> search
Type in the employee names or email, and click on save.

With that, your company structure is set.
Chats
Bitrix24 helps increase the speed and transparency of ONGOING operations. With Bitrix24 implementation, all ideas, deliberations, feedback, dissatisfaction of colleagues can now be communicated through the portal with chats. This is GOOD.If you have records of all negative feedback, it’ll be easier to track your progress in resolving them.
Tasks
Next, Organize all company projects - Do this by creating workgroups.On the left menu bar, click on “Workgroups” -> + Create -> Choose workgroup type. (Private, for example)

After creating projects, tasks can then be created within the project, and the responsible persons and moderators assigned.
For each task, there are tons of available settings for time planning. Configure them as you need.


You can also save Bitrix24 tasks as templates.
Here’s how -
On the left menu bar, click on “Tasks and Projects” -> More -> Templates.
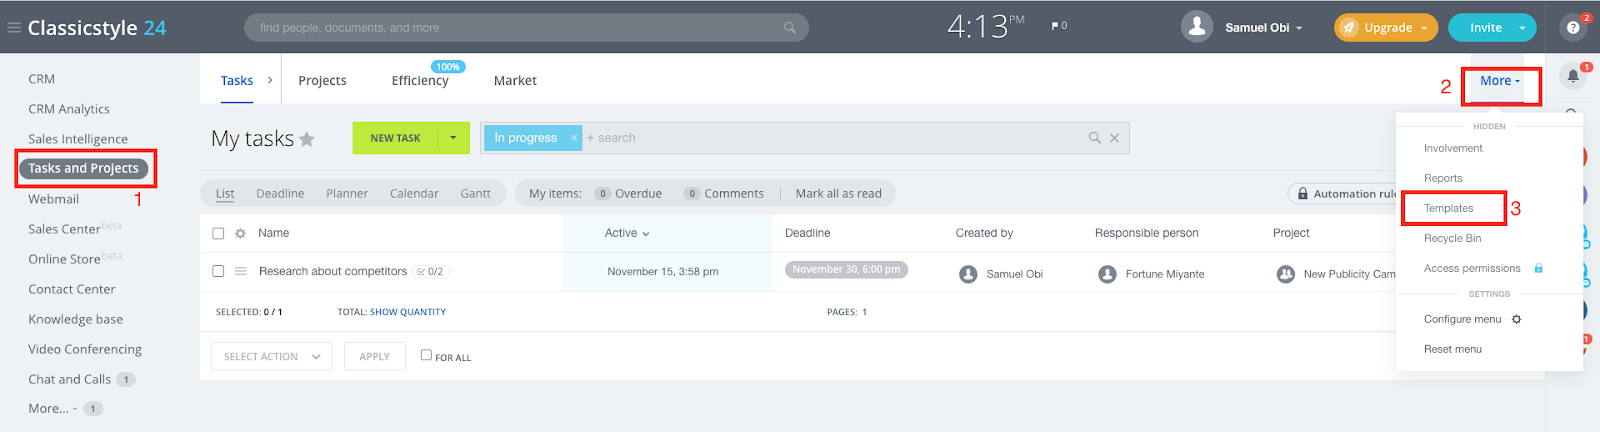
On the page that opens, click on “+ ADD” on the top right-hand corner
In order to avoid going back to a state of Chaos, you need to create work guidelines in the portal and require that they be followed. Good rules are short, logical, and fair.
Right after launching Tasks, we advise introducing the practice of employees making regular work reports to their supervisors. Reports should contain a summary of facts, results, and important emotions.
The benefit of reports is not so much in the strict control of employees, but to help form the habit of remembering what has been done on a daily basis.
Some employees can in such a way be taught to analyze and draw conclusions.
A typical set of rules:
-
General rules for working in Bitrix24 (what issues shall be read and answered by everybody)
-
Assigning responsibility (what should be done and by whom)
-
How tasks are set and what to do, if you have been assigned a task
-
Daily report - Structure, requirements. Rules of communication with the supervisor through the report.
If you "share" this article, we'll send you a package of work rules in Bitrix24.
The good news is that all employees can create reports for their work, so it’s easy for them to see their efficiency and track their progress.
To add a new report for tasks,
Click on left menu item “Tasks and Reports” ->More -> Reports -> “+ ADD REPORT”

Stage 1 - Workgroups
The Activity stream, tasks, and private chat groups are suitable for communication in 80% of cases. However, in the remaining 20% they are inconvenient.
Workgroups are required in two cases.
-
To create work guidelines for a team working on a project. Team members are invited to the group, tasks are set, and the necessary documents are uploaded. This was covered in module 2
-
To organize communication of the departments and systematize its workflows. Here, permission to create groups should be given only to project or department supervisors.
The process for creating a department workgroup is the same as that for a project.


-
Workgroup type - Uncheck the Project box (No selection)
-
users allowed to invite to the workgroup - group owner only or group owner and moderator
Stage 2- CRM
CRM in the hands of an experienced supervisor is a great tool for improving client service. The trick is to start small.
In this guide, we’re setting up the CRM for a new company, so the first step would be to configure CRM settings
From the left menu bar, select CRM->settings

It will take a while, but please go through all the tabs, from "Start point" to "other". This will help you set up your CRM fully.
We’ll look at a few cases that are applicable to almost all companies.
1. Bitrix24 integration with mailbox.
- On the left menu bar, select “webmail”
-
In the side pane that opens, choose a mail provider, then, click on “authentication”
- Bitrix24 will request for permissions, accept.
Bitrix24 supports sending emails using SMTP server. You need to specify the SMTP server address, port, login and password.

Next, You need to set what should happen when you receive an email -
-
What CRM entity should be created?
-
Queue - what users should new emails be forwarded to?
-
Who should have access to the mailbox?

If you have a private server, email Integration will require the services of a certified integrator.
You can leave a request in the form below if you would like us to help.
2. Bitrix24 Integration with Website
We have studied 8 methods of integrating Bitrix24 with websites, and we describe each of them in full. We also explain what cases they are best for. The simplest and quickest integration method is CRM form.
-
In the top search bar, type in CRM and select CRM forms -> add new form
- There’s a new form designer, so we select this to have more options
- From the “fields” menu item, you can choose what appears on the form
- By selecting page design, you can set a custom image, and colour that matches your brand identity.
- In the CRM entities tab, you can choose what CRM entity is created when the form is submitted.
You can also set orders to be created automatically.


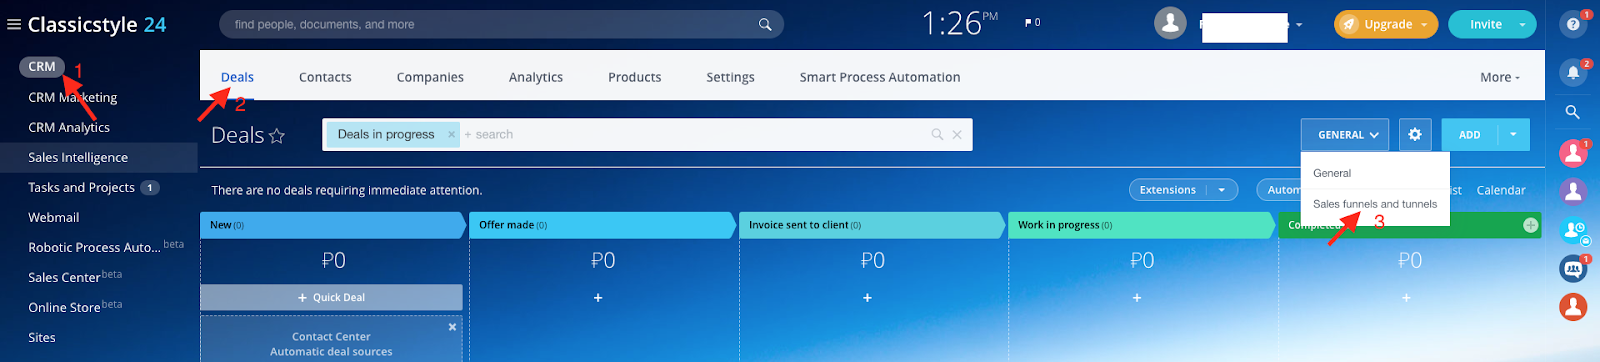
3. Creating pipelines
CRM -> deals-> Sales funnels and tunnels -> add funnel

Stage 3 - Automation
-
For creating leads from emails and contact forms on the site,
-
For creating deals and contacts from online store orders, and website pop-ups.
-
For calls
-
For emailing customers about offers, new products,
-
for marketing campaigns,
-
The list goes on...
Having a CRM should save time for your company. There should be a drastic reduction in the number of hours you spend working with client data.
CRM is implemented in stages. As your company is developing and changing, your style of working in CRM will change too. This is where a skillful supervisor is needed - to keep a balance between flexibility and orderliness.
Specify the stages of a deal, and then, set automation rules for what should happen in each stage.
As an example, we created 2 funnels

-
Orders from website
-
Remarketing
and connected the “deal won” stage of the first tunnel to the first stage of the second tunnel.
This way, we can set emails to be sent automatically regularly to our customers.
Automation isn’t meant for CRM alone.
Our advice is to turn all tasks, document flow, HR processes into automated workflows. This is neither easy, nor cheap in some cases, it's not an end in itself, but it's strategically the right move for your company.
Here are 5 business processes that every company should automate
Any work sometimes feels like routine and is tedious. Even motivated employees could sometimes follow "the path of the least stress". Only very few have the self-discipline of doing things properly.
That means that even after completing the basic implementation you will have to devote some time explaining the rules of work and controlling the process.
How do you control work?
We recommend control by the "touch" approach. It means that you control work without getting deep into it, but only checking task readiness and asking a few questions.
Quick control tools
Bitrix24 has a number of convenient means of such "quick control". These include:
-
a panel with work reports and time spent on tasks
-
Task lists
-
CRM counters
Task lists
On the left menu bar, click on tasks -> deadline.
This gives a full picture of the state of tasks at a glance
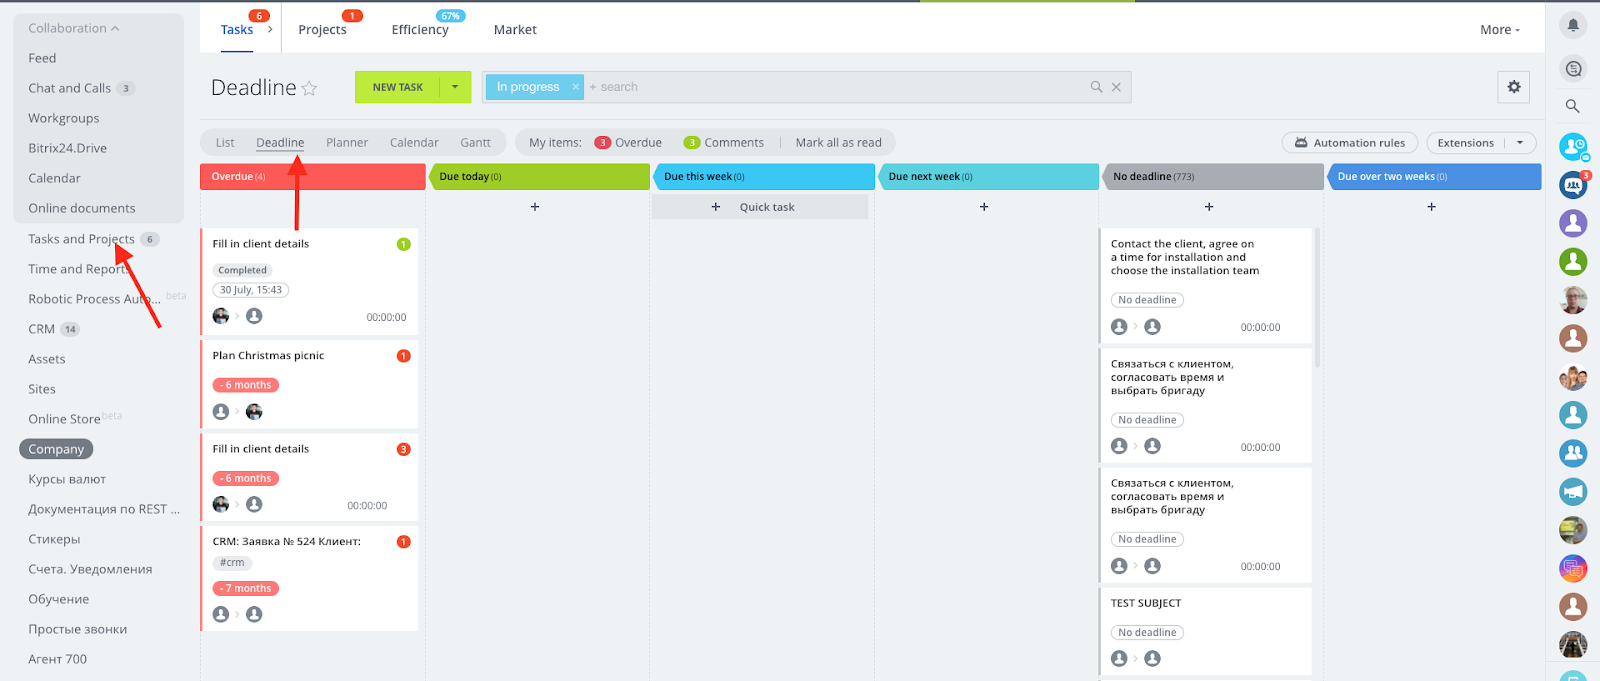
If you prefer a list view, click on list, then select the wheel icon just below list to select what details you’d like to see.


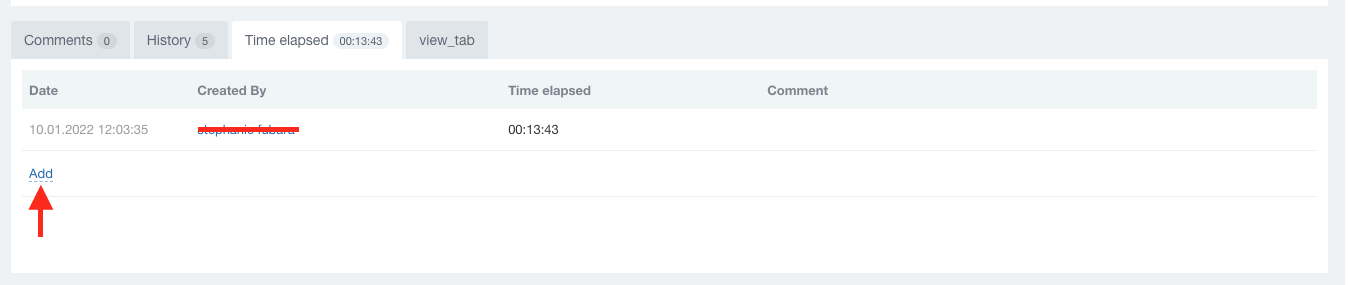
Time and Reports
Setting up reports requires a few steps
- Setting up a work schedule
- Access permissions - who should be able to see reports. Usually, employees should be able to see their own report, while supervisors and department heads should be able to see reports for everyone.
i. Setting up Bitrix24 work schedule

On the panel that opens, you can select from a fixed schedule or shifts, reporting period, what employees to apply this schedule to and the employees to be excluded from it.
In our example, we set this schedule for the sales department.
We excluded part-time workers and interns in this department and created a separate work schedule for them.
To control the number of hours employees put in at work, scroll down to the “Working time control” section.

Set the minimum number of work hours per day and who should be notified when employees haven’t put in this number of hours.
In our case, we set the department head.

Save the settings.
ii. Access permissions for reports
Time and Reports - >Access permissions -> add access permission

Here, you can add who will have access to see reports of all employees.
Portal Administrators have access to all employee reports
2. Automation rules
Use automation rules to remind employees what to do, and to send messages to supervisors when employees do not do what they are supposed to.
Bitrix24 already has some preset automation rules for when a deal is created.
Notifications to the responsible person and a control message to the supervisor when the employee doesn’t take action.


How to set automation rules
Select CRM on the left menu bar -> deals tab -> sales funnels and tunnels -> [Scroll to the deal pipeline you want to configure rules for] -> click on “configure automation rules”

For our case, we’ll set automation to “remind” the employee to place a call to the client after a new deal is created, and set a control message to his supervisor after 3 days when he doesn’t place the call.
“+add” ->for employee -> schedule a call

On the card that opens, we set the parameters as in the screenshot below.

We also set a control notification for the supervisor
“+ add” ->for employee -> control

Setting up your CRM with automation rules ensures that the supervisor has current information in the form of "everything's fine" and is only notified when something needs his attention.
If you’re reading this guide, then, you’re probably the initiator of Bitrix24 implementation in your company. You need to combine the bureaucracy in your company with the bureaucracy of Bitrix24.
There are no ready-made tools for implementing accounting and time reports in Bitrix24, you will have to use several sections.
Counting/Tracking Work hours in Bitrix24.
Work hours can be counted in several ways
how much time is spent on tasks - if you use tasks actively to assign employee duties, this method will be perfect. You will need to enable time tracking for each task, and employees should click on “start time tracking” when starting a task, and click on “finish” after the task is completed.
It’s important to note that one user can only track time for one task at a time.
If you forget to start time tracking, you can enter the time you spend on tasks manually

If the task is related to a project, add the project as shown in the screenshot below. This way, time for all tasks within this project will be summed together in the project report.

To get the reports for the time spent on tasks, go to Tasks and Projects -> More -> Reports
You can use the ready made “Tasks for last month” report, but you can create your own.

On the right, set the filter parameters : the report period, the employee for which you want to prepare the report, the project, task status, and apply.

Numerical indicators for sales activities, calls, deals etc are easily tracked in a semi-automatic mode through the CRM and its reports.
There are many ready-made reports available.
To get reports on deals won, go to CRM -> More -> Reports -> “won deals”.
Set the filter parameters: reporting period, the employee you want the report for.
It’s possible to export the report to an excel sheet, and add a salary calculation formula.
We suggest that this task should be done routinely (at the end of the month) by department heads to make the workload lighter.

Tasks that take a long time to complete e.g "for the quarter" or "for a year" need to be set as tasks, and you should require regular reports and evaluate them in an integrated and subjective manner.
The lack of a specific KPI calculation section may seem like a disadvantage of the system. Indeed, it would be much more convenient if there was such a section.
However, our Bitrix24 implementation experience shows that the requirements of organizations for the KPI system and "reports for supervisors" are so different that no "unified solution" will work.
If you actively apply a KPI formula, numerical weighted indicators, you should adjust the KPI and salaries calculation in google sheets "over" Bitrix24. This is how we do it in INTERVOLGA.
If the majority of KPI is not based on what is already being calculated in Bitrix24, you don't have to pull these calculations into the system. The implementation of Bitrix24 does not exclude other IT systems, but allows you to consolidate them.
You can also implement the following in Bitrix24
360-degree feedback, Timesheets, KPI, vacation schedule, approval of outgoing payments, contracts and documents, storage of shared files, payroll must work on the basis of Bitrix24.
Man is the most powerful animal due to the nervous system, the brain. The same feature - be sensitive and react correctly - should be applied in companies as well.
Companies are managed by people. No robot will replace a supervisor, and there is no argument about that. At least if your product requires people's creative activity and not M16 bolts.
Bitrix24 is the supervisor's long arms, attentive ears, and sharp eyes. It is the peripheral nervous system of an organization. It is right, if its development does not lead to a malfunction of the brain.
After the implementation of all the steps above, you may ask yourself: what's next? Well, first of all, congratulations. You have made a revolution. You have set your company on the most advanced tracks.
These advanced tracks are not Bitrix24. They are your employees, their involvement and enthusiasm. It is the joint energy of your enthusiastic and open-minded employees that will lead you to achieve your goals.
As the last module of your Bitrix24 implementation, we want to give some advice.
About programmers.
Techies can be managed only by someone like them. It takes a mature programmer who understands the interests of the business to manage these employees.
Don't introduce KPI for programmers as a "number of code lines" or "percentage of mistakes in the module". Only apply the "taskmaster method" in the form of deepening and bugging their brain (commonly referred to as "micromanagement").
For more insight on this issue, we advise you to study the materials of the Stratoplan school and several articles by Igor Ashmanov. Then choose a mature programmer and talk to him about the goals of business.About accountants. The accountant's KPI is the director's peaceful sleep and the absence of penalties, and tax minimization. No matter how you formalize it - the account should understand it.
As a rule, accountants don't need the management automation either, the "taskmaster-chief accountant" can solve ALL the management problems by this benign disease.About all others.
If a person does not realize that tasks set by their supervisor or the director can not be ignored, it is not KPI or algorithms that must be introduced. He must be penalized.
Conclusion
Before any formalization and automation, talk to your employees. Listen to their desires and thoughts, their motives, and dialogue with them. Work with your team personally and continuously.
INTERVOLGA had 16 years of experience implementing Bitrix24 portals in several industries and for numerous purposes: methodology, training, business processes, and software improvements.
Our ready-made modules
Twilio SMS to CRM - This helps you receive SMS and MMS in your Bitrix24 portal (7 days Free trial, subscription starts at $24/month)
MicroEDA - Automate document approval processes in Bitrix24, while collaborating with both internal and external parties. This module is completely Free to use.
Whatever your requirements are for your Bitrix24 portal, we will help you.
Leave a message in the form below.
- 16.11.2021
-
Stepan Ovchinnikov
-
Stephanie Fubara